- Domain name
- Email setup
- HTTPS SSL Certificate
- Language
- Remove branding
- Google login
- Analytics & Facebook
- Contact form
- Campaigner mode
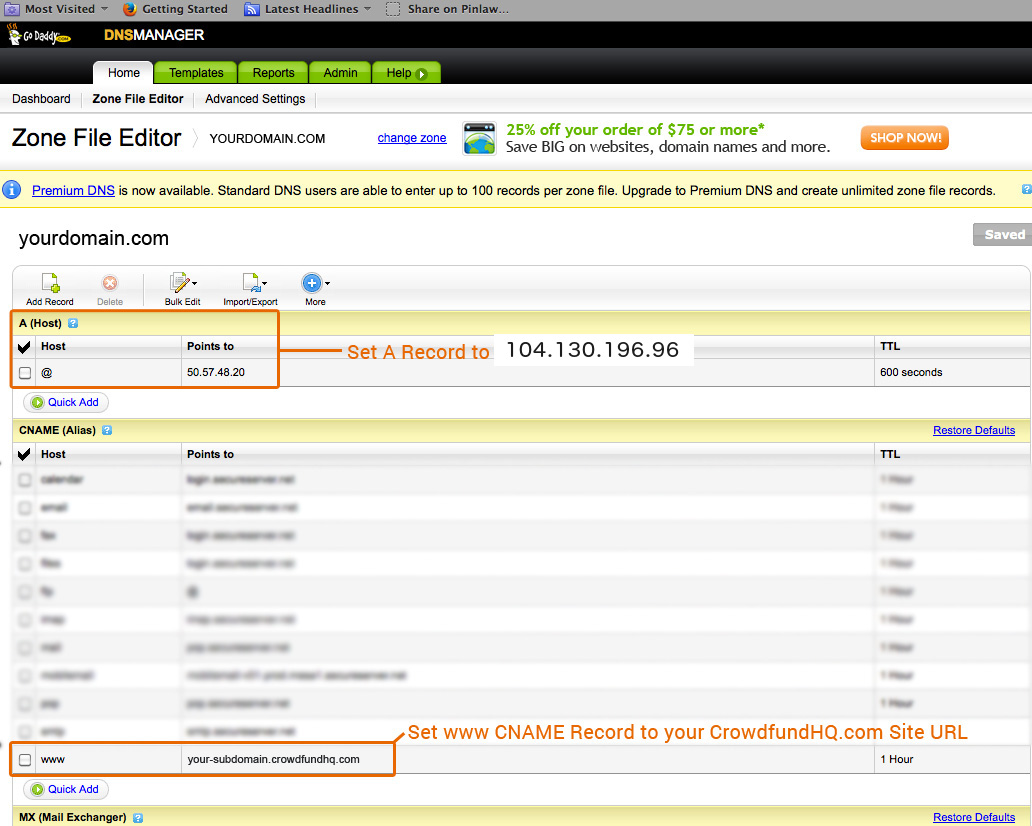
Domain Name
Edit the DNS for your domain with your registrar:
- Change your root domain's (without the www) A record to point to this ip: 45.63.75.196
-
Your "www" CNAME record should point to
YOURSUBDOMAIN.crowdfundhq.com
Replace YOURSUBDOMAIN with the subdomain your site's subdomain.
Depending on your registrar, it may end up looking something like the table below when you're done.
| Record | Type | Value |
|---|---|---|
| A | 45.63.75.196 | |
| www | CNAME | yoursubdomain.crowdfundhq.com |
Contact us when you've changed your DNS and we will set you up. Let us know if you require something special, we can do redirects and subdomain setups as well.
NOTE: If you want to use a subdomain, just add an A-record pointing to 45.63.75.196
Email setup for your domain
Go to Manage Site > Dashboard > Domains to find the email setup information for your domain. Then go to your domain name provider (e.g. Godaddy.com or Register.com), and create two TXT entries for your domain, copy-paste the hostnames and values.
Follow the guides for your provider. Send us an email if you need help.
This is necessary for you to send emails reliably, and without limits (100 emails per day).
You can edit your site emails from Manage Site > Design > Emails
HTTPS SSL Certificate
In order to install SSL for your site, you need to purchase a certificate online. Make sure you use your full domain name when creating your CSR (e.g. www.yoursite.com), or a wildcard certificate.
You can generate a CSR here: https://csrgenerator.com
Please send us the following in a zip file:
- The private key generated when creating the CSR file
- The certificate files (certificate and any intermediary certificates)
If needed, the server type is NGINX.
NOTE: If you are renewing an existing certificate, making a new CSR file might not be necessary.
Language
We support the following languages:
- - English
- - Español ( Spanish )
- - Português ( Portuguese )
- - Français ( French )
- - Deutsch ( German )
- - Italiano ( Italian )
- - Nederlands ( Dutch )
- - Norsk ( Norwegian )
- - Pусский ( Russian )
- - 日本語 ( Japanese )
- - 简体字 ( Chinese Simpl. )
- - 正體字 ( Chinese Trad. )
If you select multiple languages, a language selector will appear on the website.
Remove Branding
The default CrowdfundHQ site has a small link on the right side of the footer. You can easily remove that by either adding a customized footer, or go to Manage Site > Configuration > Settings > Options > Hide CrowdfundHQ link to hide it.
Google Login
To set up your site to let users log in with their Google accounts, do the following:
Google API Setup
- Go to https://console.developers.google.com
- Select or create your project.
- Click APIs & auth then APIs.
- Enable the Contacts API and the Google+ API
- Click Credentials and Create new Client ID
- In the new form, select Web application
- Set Authorized JavaScript origins to be the URL of your CrowdfundHQ crowdfunding site (http://www.yoursite.com).
- Set Authorized redirect URIs to be http://www.yoursite.com/auth/google_oauth2/callback
- Make a note of your Client ID and your Client Secret
- Click Consent screen
- Fill in your email address and your Product Name, usually the name of your site.
CrowdfundHQ Setup
- Go to Manage Site > Configuration > Sharing > Login and paste your Client ID and Client Secret from Google into the Google Client ID and Google Client Secret fields.
- Click outside of the box to save. Your users will now be able to log in in with Google.
Analytics & Facebook
Google Analytics
To track your site using Google Analytics, you'll need to find your Google Analytics ID for your domain and enter it in the Google Analytics Tracking ID field. This ID starts with "UA" and is in the tracking code Google gives you.
Facebook Sharing and Login
The Facebook App ID helps count and track the likes of each campaign, and enables Facebook login. To get a Facebook App ID, you'll need to register your personal Facebook account as a Facebook Developer.
Use this link if you have trouble with Facebook sharing: Facebook Debugger
Set up Facebook login
Log in with your Facebook account on https://developers.facebook.com
- Select Create New App from the dropdown in the upper left.
- In the Create a New App ID dialog, provide a Display Name and Contact Email, select a Category and click Create App ID.
- Complete the Security check.
- On the Product Setup page click Get Started next to Facebook Login.
- Set Web OAuth Login to Yes. Enter the following URL in the Valid OAuth redirect URIs to be http://www.your-domain.name/auth/facebook/callback
- Click on Quickstart under Facebook login, in the left navigation and choose Web.
- This will bring up the Tell us about your website field. Enter your site's URL, i.e http://www.yoursite.com and click Save and Continue
Make your app public
- Click on App Review in the left navigation. Near the top of the page make the slider say Yes for making the app public.
- Click on Settings in the left navigation. Take a note of your App ID and App Secret.
- Log into your CrowdfundHQ account and copy-paste your Facebook App ID and App Secret into Manage Site > Configuration > Sharing > Plugins > Facebook Login
Contact Form
Your site comes with a built-in contact form. Go to http://www.yoursite.com/contact to check it out. The contact field will automatically send an email to the site email address or the account email address. Make sure your email account can receive emails.
You can change your site email address by going to Manage Site > Configuration > Settings > General > Site Email Address.
Campaigner Mode
All
Lets all users sign up and create campaigns. This is what most crowdfunding sites use.
Single User
Only the admin and selected users can create campaigns. The site owner can define who creates campaigns from Manage Site > Users